Help
Getting help, replacements, returns
If you need help with a product, be that instructions, replacement or return, please email us at hello@twraps.com or use the yellow chat button at the bottom right corner to start a chat. We usually respond within a few hours on work days (9am-4pm PST).
Installation Videos & Instructions
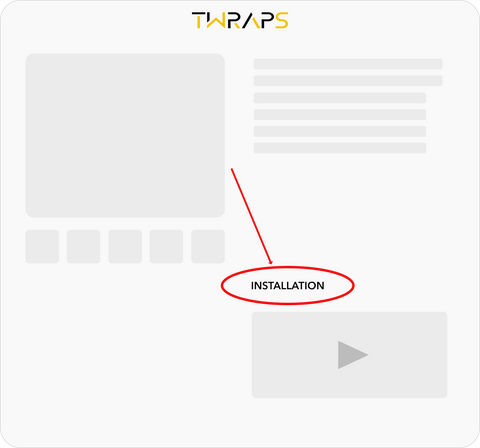
To find the installation video & instructions for a specific product, please follow these steps:
1. Click on the search icon on top

2. Type the name of the product

3. Open the product page and find the INSTALLATION section

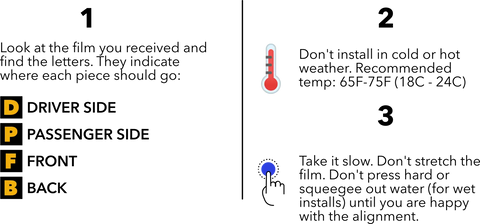
Important notes about installation

How to deal with common issues
-
Bubbles during install
The best way to deal with bubbles is to not let them happen during installation. If you see a bubble forming while installing, simply lift up the film (slowly and carefully, vinyl & PPF is highly stretchable), and re-apply it. If you are installing PPF, make sure to re-spray it. When re-applying it make sure to not lay it all at once, but in small segments while using the squeegee to tack the film firmly to the surface.
-
Bubbles after install
If you missed some bubbles only to find out after the installation is complete and the film has cured, don't worry, it's easily fixable. For most small bubbles, just leaving the car out in the sun for a day or two is enough. If you have bigger or more stubborn bubbles, just poke them with a needle, squeeze the water/air out and press on the film to make it tack. Heat from the sun or a hairdryer/heat gun will make the poked hole disappear in a while.
-
Wrinkles
Our tailored wraps are made in a way that minimizes wrinkles but for some trickier curves you might still end up with wrinkles. There is no universal rule on how to deal with wrinkles as it depends on the specific situation, but you can follow a few rules of thumb: lift up the film just enough to lift the wrinkled part, and heat it with a hair dryer or a heat gun, that will shrink it and soften it which will make it easier to give it another try. Another important thing to notice is the direction of application (this is important to pay attention to, in our installation videos). The direction of installation should be such that you lead the squeegee outside of wrinkle prone areas (curves) towards flat areas, this way the film has more space to absorb the deformation and end up with a nice smooth surface. If you are still battling specific wrinkles and nothing helps, just email us with some photos at hello@twraps.com and we'll help.
-
Tacking/adhesion issues
Depending on what you are installing, please follow these rules:
For PPF with wet install you can promote adhesion/tacking by spraying clean water (without soap) at the adhesive side. This will wash out the soap and make the PPF stick. Another thing that helps a lot is to use a hair dryer or a heat gun to warm up the film. If nothing else helps just leave it alone for a few hours (in a clean environment) and go back to it after that. The water would've evaporated allowing you to easily finish your installation.
-
Dirt under screen protector
Use the dust removal stickers to remove dirt under a screen protector. Lift up the screen protector from the side closest to the dirt, all the way to the dirt and about an inch more. Do not remove the entire screen protector from the screen as this will likely introduce new dirt.
Dirt would've stuck on the adhesive side of the screen protector, but since the screen protector's adhesive is lower tack than the dust removal stickers, the dust removal sticker should be able to pick it up from the screen protector's adhesive side. Be careful and avoid leaving fingerprints on the screen protector adhesive. Once the dirt is removed, simply re-apply the screen protector.
-
Dirt under PPF
If the dirt is near the edges, you can try lifting up the PPF, spraying with clean water and using tweezers to remove the dirt, then re-apply. If the dirt is in the middle of a big piece (hood, bumper etc), and you notice it once the installation is complete and the PPF has cured, there isn't much you can do.
Need help?
We're available to help you every business day from 9am to 4pm PST via e-mail (phone support coming soon). Just email us at hello@twraps.com and we'll get back to you on the same business day!

